the shop Image Map
Showing posts with label Recipes. Show all posts

Wednesday, October 3, 2012

Pumpkin spice goodness {RECIPE}

Let me share with you my major fall weakness.

Pumpkin Spice

I buy one of these Mainstays Pumpkin Spice candles every time I go to the big "W" store that I sort of despise, but is closer than any other store so I go to anyway. It smells like fall and I burn it all day long.


I wait every year until this beauty is available.


A Pumpkin Spice Frapaccino is my all time favorite drink! Every year for Christmas I ask for a Starbucks gift card and I save it all year long just so I can use it in the fall on this gorgeous goodness.

If the candle and the drink weren't enough how about these beauties?


Thanks to my little doughnut maker (you can also use a doughnut pan if you'd like) we have made these quite often already this season.


You want the recipe don't you. You know you do. Okay you talked me into it. 

Here's what you need:
 1 3/4 Cups Flour
1 1/2 teaspoons Baking Powder
1/2 teaspoon salt
2 teaspoons pumpkin pie spice
1/3 Cup vegetable oil (or applesauce)
1/2 Cup brown sugar
1 egg
2 teaspoons Vanilla
3/4 Cup Canned pumpkin
1/2 cup milk

for topping:
1/2 Cup melted butter
1 Cup Sugar
2-3 teaspoons Cinnamon

In a medium sized mixing bowl mix flour baking powder, salt and pumpkin pie spice. Set this bowl aside.

In a large bowl whisk together oil, brown sugar, egg, vanilla, milk and pumpkin. Mix together until it is all well combined. Slowly add the flour mixture and stir just until combined, don't over mix or your doughnuts will be kind of tough.


Spoon the batter into a gallon size storage bag and snip off the corner. fill each doughnut spot and close the lid. bake about 4 minutes or until the done light turns on. :) If you are using a doughnut pan be sure to grease it well, fill the doughnuts spots and bake at 350 for 8-9 minutes.


Once doughnuts are complete allow them to cool on a wire rack. While they are cooling melt butter. once cool dip in butter and then in cinnamon-sugar mixture. 

Eat them while they are warm! They are the best that way. If you want to keep them warm for a while stick them in your oven on the lowest temp possible. I did this until my husband got home and they tasted like I had just finished dipping them.

They are just as good as they look. Better even!!


I linked up to this fun new blog I found! Can't wait to try her recipe too!


Monday, October 1, 2012

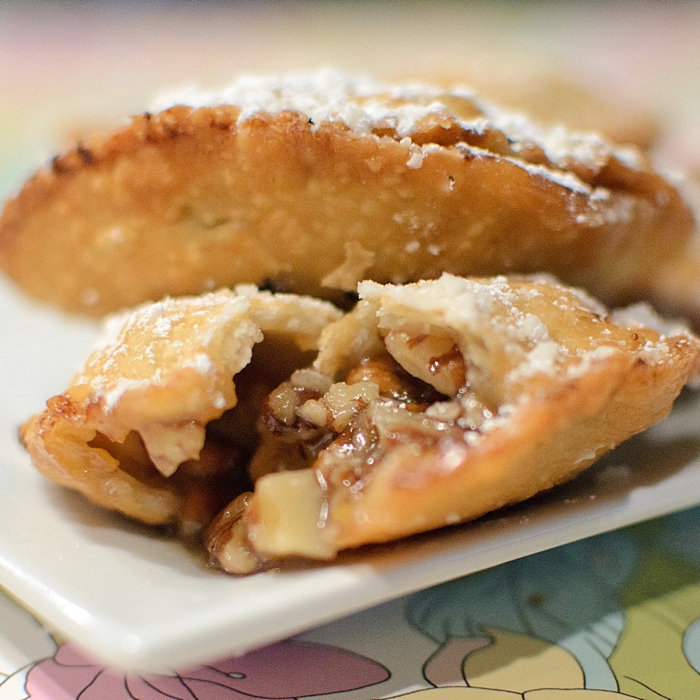
Pecan Pie Pockets {RECIPE}

My little brother came for a visit a little while ago. While he was here he found a deep fryer at a garage sale for $1.00 he bought it, used it once and with now way to get it home gifted it to me. I'm not sure if I should be saying this, but it was THE BEST GIFT EVER! 


The night he gave it to me I made Fried Chicken (recipe to come soon and also to die for) and tater tots (yes along with the mashed potatoes to go with the dinner. And as it turns out are so much better when not baked in the oven). I could not stop though so I scanned my ever faithful Paula Dean recipe books and magazines for something fried. It didn't take long and I found these!


Pecan Pie Pockets
My husband spent some time in Georgia and he gets fake angry with me when I pronounce it "pea-con".  Apparently in Georgia and the ONLY correct way to say it is "pea-CAN". He told me if I ever wanted to meet Paula Dean, which is my dream come true (she is my idol, my inspiration, my world. Maybe that's over the top, but close!) then I'd better learn to say it right.


Lets get to it. This is what you need:

1 Cup Sugar
2/3 Cup Light corn syrup
1/3 Cup Butter, melted
2 Large Eggs
1 1/2 Cups Chopped pecans
1/8 teaspoon Salt
1 teaspoon Vanilla
1 1/2 (15 ounce)Packages refrigerated pie crust
1 Egg yolk, beaten
Oil for frying
powder sugar for cute factor.


And here's what you do:


unroll pie crust on a lightly floured suraface. Cut into circles ( I just used a glass, but if you have a round cookie or pastry cutter that would work perfectly too). Re-roll dough and repeat until you have all the circles you can get.

In a medium saucepan, combine sugar, corn syrup, melted butter and eggs. Stir in pecans, vanilla and salt. Bring to a boil over medium heat; reduce heat, and simmer for 10 minutes.


Poor filling into a bowl and allow it to cool until it is room temperature.


This step is very important! Do not be impatient!
 NOT DO THIS!! I made the mistake of not letting the filling cool to room temp before attempting the pocket. Big old FAIL (I still cooked it and ate it anyway. Sad I know, but they were so good I couldn't just waste one!)


lay one of your cute circles on a clean surface and brush the egg yolk around the edges. Hold newly brushed circle in your hands and gently fold in half creasing just the corners. Then scoop 1 Tablespoon of pecan filling into the center and continue to press around with your fingers.


Now go around your little pocket with a fork. Make sure to not puncture you little pocket or the filling will leek out during the frying.


They will look so nice and cute. They will be begging you to put them in that hot oil to transform them into the beauties they were ment to be.


Fry those little babies up! You'll want at least 2" of oil. heat oil to 350 degrees fry pies, in batches, for 1 to 2 min. per side or until lightly browned. Drain on paper towels. Then comes the fun part. Dust those little cutes with some powder sugar. Isn't it obvious that I need a powder sugar duster! Maybe that will be my next kitchen purchase.


Eat them warm, but not too hot. They are still good the next couple of days, but they are divine warm and maybe a little ice cream on the side?


Monday, August 20, 2012

Sweet and chewy in all the right places {RECIPE}

I LOVE baking! 
I do not, however, love baking chocolate chip cookies!
 I have never had a chocolate chip cookie I could not stop eating. In fact I've never had a chocolate chip cookie I really cared to finish (that didn't change the fact that I would finish it though).
 When I was little I used to ask my mom to make me chocolate chip cookies without the chocolate chips, that's how little I cared for this particular dessert.

 I have always enjoyed the dough much, much more than the baked counterpart. For this reason I have never really baked CC cookies often. I've never been the one to take them to the neighbors. I preferred sharing things like salted caramel cupcakes (my very favorite!) and cheesecake. That was until about three weeks ago. My good friend, and old next door neighbor Niki, and her daughter came to visit us at our new house. She is an amazing woodworker and I had a list a mile long of things I needed help with as I am NOT an amazing woodworker. While she was here slaving away for me, she shared this amazing recipe. 


I made it that night and I haven't stopped baking them since. I honestly have gone through one 10 pound bag of flour and five pounds of butter.  These cookies are what chocolate chip cookies were supposed to taste like.

 They are supper soft and chewy. They bake into perfect circles every time. Right out of the oven the edges have a nice little crisp to them and after a few minutes "they have the consistency of butter" as my brother said on his last trip here. Stop reading this now and go bake them! I can't think of a night better than these beauties fresh out of the oven, working on a new quilt, and a great episode of Downton Abby. I'm hooked on all three!! 


First let me introduce you to one of my favorite kitchen tools...


This little baby is my pride and joy.  It seriously makes mixing with my Kitchenaid a riot! It scrapes the edges as it mixes and it is incredible...Ok on with the recipe!

What you'll need: 
3/4 c. unsalted butter, softened 
3/4 c. brown sugar 
1/4 c. granulated sugar 
1 egg 
2 tsp. vanilla extract 
2 c. all purpose flour 
2 tsp. cornstarch 
1 tsp. baking soda 
1/2 tsp. salt 
1 c. milk chocolate chips

First, beat the heck out of the butter and sugar. This is what is meant when normal recipes say cream. This step should take 5-7 minutes on the highest mixer speed your little mixer can handle. The sugar crystals cut into the butter creating air pockets and this is part of the amazing finished product (that and the genius idea of cornstarch-honestly try it)!


After butter mixture is nice and fluffy, add egg and vanilla, then mix again.
Add all remaining ingredients and mix together. Then taste some and scoop onto cookie sheets (using my other favorite kitchen tool!)


Bake @ 350 degrees F. 8-10 min. (In my oven it takes exactly 10 min. Do not bake longer than 10 min. The cookies may look fluffy and underdone, but don't do it!


Let cool on cookie sheets for 5 minutes then move to cooling racks to finish cooling.


Now just poor a nice glass of milk and ENJOY!! Oh and let me know when you try them. I'd love to hear that I'm not the only one addicted to these delicious bites!

Related Posts Plugin for WordPress, Blogger...